Thursday, January 16, 2014

Stampin Up! ~ No Matter What

Hi there!

Today I am showing a card I made for my mom this month. She gets one every month from me :o) This is another File Folder Pocket card. I used Real Red Coredinations cardstock, Pool Party cardstock, Whisper White cardstock, DSP called Sent With Love, Island Indigo ink, Pool Party Stampin Write marker, Real Red button, a Basic Rhinestone, the Pansy Punch, the stamp sets are Flower Shop, Petite Pairs and Itty Bitties. The twine isfrom TSQ and the embossing folder is a Sizzix called Flowers.

Now for the card :o)


To see the video tutorial for this card style just click HERE
To order products just click HERE

Thanks for coming by again!
Hugs!

Tuesday, January 14, 2014

Stampin Up! ~ Happy Birthday Wishes

Hello!

Today I am posting a birthday card that is going off to my oldest sons girlfriend :o) I just love the style of this card! The supplies I used for this one are from a retired Simply Scrappin' Kit called Pinwheels on Parade. The colors in this collection are Night of Navy, Pool Party, Real Red and I think the yellow is More Mustard but, I am not sure since it wasn't listed and I can't match it to any of the current colors :o) I also used Whisper White cardstock for my base, Stampin Write markers, Basic Rhinestones and the sentiments are from a stamp set called Petite Pairs. You can get any of these items, minus the Simply Scrappin' Kit, in my store HERE.


Have a great day!

Monday, January 13, 2014

Note Cards and Bag

Hi Everyone!

Happy Monday to you all! I am posting a little project I made about a week ago and forgot to post then :o) This is a little bag made out of cardstock and some 4 1/2 x 4 1/4 note cards to go inside. I used some pre-cut cards I had left over from making some bookmarks for Caleb's class last year so I am using them up :o) The Paper I used for these cards and the bag is from a Paper Studio pad called Girls Just Wanna Have Fun, super cute paper! I will have a video tutorial up soon to show how the bag is made :o) The stamp set I used is from Stampin Up called Flower Shop and the sentiments are from Lacey and Lovely and Itty Bitty Banners. You can find these in my store HERE.


Have a fantastic week! Hugs!

Wednesday, January 8, 2014

Stampin Up! ~ Hello

Today I am showing a little set of cards I whipped up last night. I didn't want anything too involving yet I wanted them to be cute. I think I accomplished that :o) I plan on making some more of these and giving them to my mom to pass out when she feels the need. These little cards measure 4 1/2 x 4 1/4. I also have a little bag/box that they will fit in along with envelopes. I still have to assemble that piece and I will post that when I finish. The colors I used are from the In Color 2013-2015 Collection. I LOVE these colors! Baked Brown Sugar, Coastal Cabana, Crisp Cantaloupe, Pistachio Pudding and Strawberry Slush. I also used the stamp set called Lacey and Lovely along with coordinating cardstock of each color for my 1 1/5 inch scallop circles. I used a Cuttlebug embossing strip for the polka dots on the front of each card and finished them off with a Basic Rhinestone from Stampin Up also. All of the products used you can find in my store HERE.


Thank you all for stopping by again, Hugs!

Monday, January 6, 2014

Stampin Up! ~ Happy Birthday

Hello there!

I hope you all had a terrific weekend! We got a lot of snow and it is super cold. I cannot wait for Spring :o) Here are a few cards I made last week using a retired Simply Scrappin kit from Stampin Up! called Bandstand. I love the colors in this collection... Cherry Cobbler, Old Olive, Pool Party and So Saffron. The buttons are from the Brights collection and the yellow is actually Daffodil Delight but, it's all I had I had :o) The number stickers are from a Me and My Big Ideas sheet from a really long time ago. The style of this card is called a File Folder Card and it measures 5 1/2 x 4 1/4 landscape, your basic A2 size card. I used the We are Memory Keepers Envelope Punch Board to create the card and will attach the video tutorial for you also :o)

These cards are for my Best Friends daughter's birthdays this year :o)


Here is the video tutorial for you :o)

Hugs!


Thursday, January 2, 2014

Happy New Year!

Welcome to 2014!

New year.... New look :o)

Since I have decided to get back in to my blog I also decided it was time for a new look. As much as I love my beloved Tinkerbell I needed a change. I suppose it goes with the whole "out with old, in with the new".  I have been putting all of my time in to making my videos for my YouTube channel, babytweetums, and working on my new adventure with Stampin Up!. My goal is to get my blog up and running smoothly again over the next few weeks. I will still be posting my regular projects and tutorials along with my Stampin Up stuff. I hope you all will continue following me this year :o) Here are a few links for you in case you are interested in what I am doing...

Facebook ~  Schell Fabian (also on the side bar ------>)
Business Facebook ~ Stampin Up with Schell
Website ~ Stampin Up Store
YouTube ~ babytweetums

I hope you all had a super fantastic holiday and I look forward to hearing from you again!

Hugs!

Saturday, October 26, 2013

Some super exciting news!!!!

Hello everyone!

I know it has been a long time since I have posted anything. I have been paying more attention to my YouTube channel and Facebook lately. My love is definitely in my videos :o)

Speaking of videos... I will be doing a lot more, even though I am up to 214 currently on my channel babytweetums. My future videos are going to revolve around Stampin! Up products due to the fact that I became a Demonstrator on Friday October 25th! But, don't worry, they will not all be Stampin Up videos since I do love my other products still :o) I am so excited about all of this and since it is all so new I am still learning. Good news is... my store site is up and running so click here Schell Fabian to go on over and take advantage of the 25% off of 25 stamps sale going on through October 28th, only two more  days! Another good thing is that I have a Facebook fan/business page and that is located here Stampin Up with Schell, I would love for you all to go over and hit LIKE :o) Not much up due to I haven't received my starter kit just yet but, in no time I will have tons of stuff to share! I will also be creating some clubs and groups on my regular Facebook page here Schell Fabian - Schells Craft Corner so come friend me or follow me to see what's going on! I shall be back real soon!

Big Hugs!

Monday, July 22, 2013

Number 8 Card and Extras :o)

Hello!

Today I have to share what you can make out of one sheet of 8 1/2 x 11 sheet of cardstock. I recently started making some cards, I call them Number 8 size, that fit in a standard mailing envelope. Well... instead of just keeping the rest of what I cut as scraps, I made two more projects out of it. Here is what I came up with...


And here is the video showing a closer look...

I hope you all have a fantastic week :o)
Hugs!

Wednesday, July 17, 2013

Whooo's Turning One!

Hey there!

I am posting a birthday card I made for my baby brother Chance. He turned the big ONE today :o) He is just too cute and I get to be the one to take care of him for daycare :o) Really good little guy! His party is going to be owl themed so naturally I made him an owl card, and he wobbles!!!! Well, the owl does :o)

This is Chance...


And this is his birthday card...


The inside...


And the wobble action!


Hope you are all doing well :o)

Hugs!

Monday, July 15, 2013

Minnie Mouse

Hey all!

Today I have another altered composition notebook I turned into a journal for a special girl. My son Maverick has started dating :o) His girlfriend's name is Maiah and they have known each other for the last three years. She moved out of state at the end of their Sophomore year and stayed in touch. They will both be Seniors this school year and the plan is that she is moving back after she finishes school. I wish them the best for their relationship and friendship. Distance makes the heart grow fonder, right? Oh, to be young again :o)

Here is her journal... 

 I used the Mickey Font cartridge for her name and Minnie, the paper came from a Paper Studio stack called Uptown Flair. The mat for Minnie is a Nestabilities die Labels 25.

I also attached a ribbon with a letter bead (M) 
on the end for a place marker

I hope you all have a wonderful week :o)

Hugs!

Thursday, July 11, 2013

HELLO!

Hi everyone!

I know I have been missing for a while but I am slowly getting back in to my crafting. I have been dealing with a medical issue with a family member for the last 6, almost 7, weeks. Still have a long way to go so my posts are kind of weak lately. Thank you to all of those that have said prayers for my family! Please keep them coming as we are going to battle for a while.

On a good note... Here are a few things I have been working on :o)

Disney Mini Albums!

We took our Disney World trip in June and I wanted to make a few albums. I have yet to get mine done :o) This first one is Caleb's Pocket Paper Bag Album and it holds 30 photos...


This next one is one I made for my mom that I designed myself and it holds 60 photos...


Hope you all like them! They were tons of fun to make :o)

Hugs!

Saturday, May 25, 2013

Goofy Boys :o)

So my guys like to goof around a lot outside. This is a funny video they did using Dallas' camcorder one day. I stumbled upon this video while using the camera myself and when I was taking the video I had done off of the card I decided to look at some of the videos that were left and this was just so funny. I got their permission to share it with you all so here it is...


Hugs!

Thursday, May 23, 2013

Getting ready for Disney World!

Hello!

We are getting ready to go on our Disney World trip here very soon :o) So exciting! I love Disney and never get enough each time we go back. Well, being in the Disney bound mood I wanted to get a little start on some cuts to use on the book I will make for our trip when we get back. I have some cuts I did  using the Mickey and Friends cartridge and some I customized using my Gypsy with a few different cartridges. I love having this thing for just that. I get these ideas that I can see  in my head  and with the ease of my Gypsy, they come to life :o) Here are the ones I did using the Mickey and Friends cartridge...


Now this next set of cuts I used my Gypsy for. I created these using Teddy Bear Parade, Mickey and Friends and Simply Charmed. I absolutely LOVE the way they turned out! Here they are...


I hope you all have a fantastic Memorial Day weekend!

Hugs!

Monday, May 20, 2013

Happy Birthday Caleb!!!!

Today is my little man's birthday!

I tried making him a card but, when I got done putting together the main focal point it ended up being too big for a card :o) So... I made a card front that measures 8 x 8 1/2. I used the Teddy Bear Parade Cartridge for this and I love how it turned out :o) This bear is cut at 6 inches!

Here it is...

Happy Happy Birthday Caleb!
I love you :o)

Hugs!

Wednesday, May 15, 2013

Flowers

Hi everyone!
Today is my day to post for The Scrapbooking Queen's Digi Team :o) The theme this time around is Mother's Day/Flowers. Well, I used these flowers, courtesy of Bugaboo Stamps, for Mother's Day cards. I love this one and since it can be used for just about anything I will be using it often :o)

 Here are my two cards...
For the coloring I used my Marvy Le Plume Alcohol markers and accented them with some stickles :o)
Have a fabulous week my friends :o)
Hugs!

Friday, May 10, 2013

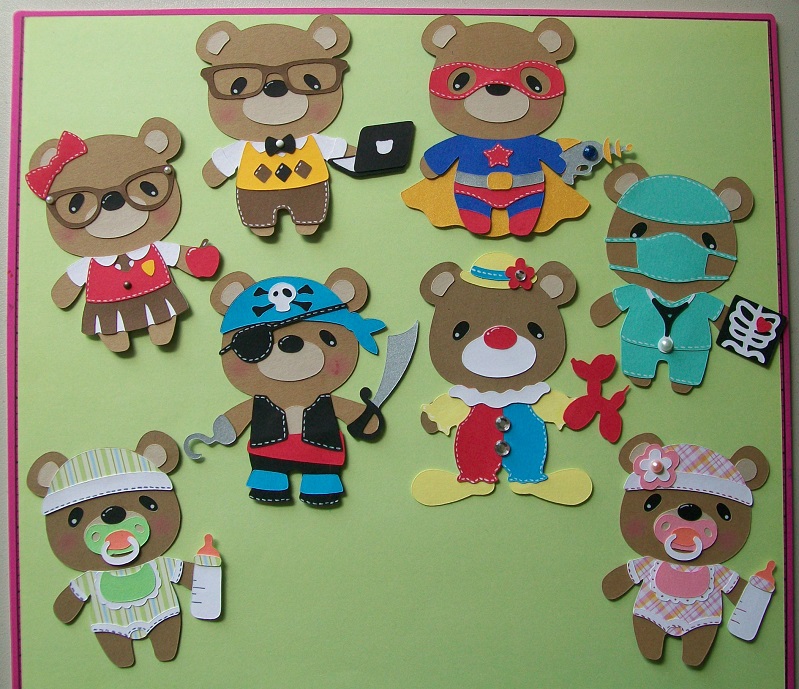
Teddy Bear Parade!

TEDDY BEAR PARADE, OH BOY!

I just got this cartridge this past Sunday and started cutting out bears on Tuesday. LOVE IT!!!! These are just way too adorable. This is what I have done so far. These are all from scraps again minus the actual bear pieces. Had to cut in to some full size sheets to cut several at a time :o) Did lots of doodling  and used some stickles for accents. If you click on the pictures they will enlarge so you can see better details :o)


I love how some of the cuts can go for either a boy bear or girl bear making some slight adjustments. Like the baby... I just didn't put the flower on the hat and used boy paper to cut out his outfit and accessories :o)

Have a wonderful weekend :o)
and to all the mom's out there...

Happy Mother's Day!

Hugs!

Thursday, May 9, 2013

Using Scraps Batch #13

I have some more Cricut cuts I have been making to share. These are all cut from the Create A Critter cartridge and are various sizes. I wanted to use my new Peachy Keen stamps. These are PK-490 Everyday Character Face Assortment and the PK-293 The Cornies Face Assortment. Super fun faces to use!

Here are my creations :o)

Have a wonderful rest of the day!
Hugs!
Wednesday, May 8, 2013

A+ Teacher

So since this week is Teacher Appreciation Week I made this post it note holder for Caleb's teacher. He is going to give this to her and a little something that we will pick up later at the store. Probably chocolate :o)

Here it is... and yes! I used a Action Wobble :o)


Have a great rest of the week everyone!
Hugs!

Saturday, May 4, 2013

Hello Sunshine!

Well Hello Everyone!

I am posting again for the all too AWESOME Action Wobble Team :o)

It has been a while since I have posted but, I am back now! For my project I used one of The Scrapbooking Queen's stamps "hello sunshine" from her set Royal Garden. I just love this one!  The sun I cut out using my Cricut and the Create A Critter cartridge, stamped it with a Peachy Keen Face from PK-490 "Everyday Character Face Assortment", did some faux stitching a fine tip black sharpie and chalked some little pink cheeks. The best part is that it WOBBLES, YAY!!!! Here is a lookat this Easel Post It Note Holder I put together...


The Action shot :o)

Side view

Complete with pad :o)

Now... if you have never used a wobble and are in need, head on over to The Scrapbooking Queen's Royal Shoppe and pick some up today!
If you have already used a wobble before, go on over and get you some more. These things are way too much fun!

See you all next time!
Hugs!

Wednesday, April 24, 2013

Altered Composition Notebook

Here is  an altered composition notebook I made for my mom :o) She had an extra one just sitting around so she  asked me if I would cover it for her, of course! I used a Paper Studio Pad called Lola & Luca, very pretty papers! The ovals were cut using my Cricut and a Nestabilities die called Lacey Ovals. Rhinestone's are from Michael's and the line of Rhinestone trim came in a RAK I received last year :o) Thanks Stacy!!!! The sentiment is from a set called Royal Sayings Two from The Scrapbooking Queen :o)


Hugs!

Friday, April 19, 2013

Book Worms :o)

Here are some worms I cut out using the Create A Critter cartridge and my Gypsy. These were cut at 2 1/4 inches and stamped with a Peachy Keen Critter face. I am making Caleb's end of the year gifts for the class and we decided on bookmarks this year. I think they have turned out awesomely cute :o) The patterned paper I used is from a Recollections paper pad called Bright and Basic.

Here is a look...

All of the pieces ready to assemble...

The finished Bookmarks...

Now I just have to assemble the rest of them and all are ready to go. Better early than late, right? 
Have a great weekend everyone!

Hugs!

Wednesday, April 17, 2013

Using Scraps Batch #12

So... I pulled out my cricut last night along with my Love You A Latte cartridge and got busy cutting away. These are my cuts, twelve total :o) I used my white Pentel Sunburst gel pen and a couple of Bic markers for the doodling, some stickles and some liquid pearls to accent them with. All of these are cut between 2-3 inches. I think they are perfect for a small card set :o)

Here is a look...

Have a wonderful week :o)
Hugs!

Monday, April 15, 2013

Punched Flower Tutorial

Hi Every One!!!!

It has been a while since I have been up here. Almost ready to get back in to regular posting but, in the meantime I have been doing a lot of videos for my YouTube channel babytweetums. I really enjoy making my videos so go on over and check some of them out :o) Here is one of my latest tutorials on making layered punched flowers... enjoy!


Hugs!

Friday, March 29, 2013

New Tutorial

Happy Friday Everyone!

This afternoon marks the start of my boys Spring Break, yay!!!! I love sleeping in :o)

Today I have a video to share on how to make the pages for my Flip Style Photo Album. Enjoy!


Have a GREAT weekend and a very
HAPPY EASTER!

Hugs!

Monday, March 25, 2013

Flip Style Photo Album

Hi Every One!

Here is the book I was talking about in my last post... I love it and am working on a how to video :o)


Have a fantastic week :o)
Hugs!

Thursday, March 21, 2013

RecipeBook

Hi all!

After doing my Homemade Smash Book Series I decided to step it up a little and create some different kinds of books. I just love this binding technique and will be using it a lot now :o) So far I have made smash books, journals, address books, a recipe book and am working on a new book now to show soon. If you go over to my YouTube channel you can see all the videos for these books. Here is the latest one for the Recipe Book...


Have a wonderful day!
Hugs!

Sunday, March 17, 2013

HELLO!

Hi Everyone,
Happy St Patrick's Day!

It seems  like forever since I have posted anything here. I was busy working on a series of videos for a tutorial called Homemade Smash Book Series. You can see the series on my YouTube channel HERE. Then I had a terrible incident when trying to upload the last video of the series... my laptop DIED! Completely dead, no recovery at all. I lost a lot of important family moments and videos so that was a little rough to deal with.

Well, I have a new laptop BUT, it has been kind of a pain to learn. It has the new windows 8 and so far I am not a big fan of this. Not very easy to learn so I am still working on it. So that being said, you won't see any project photos for a little while due to losing my watermark in the old laptop, yeah I know, I should have had  a copy of it somewhere :o)  Now I have to learn how to make one all over again. My program I used before is not compatible with the new version of windows  so I have to learn a new one, which is not going well :o(

Some good news is... Jeremy, awesome hubby!... bought me a 1TB external hard drive for back up this time. YAY!!!!! This has been something to have to learn also. Not the drive itself, I just plug it in and open it, but, remembering to save everything twice, once in the computer and then moving it over for safe keeping :o) I haven't been too bad at remembering this after thinking about what I lost  the first time so I have been really good :o)

Here are some cream cheese spritz cookies I made for the boys for  St Patrick's Day this year. They are super yummy!


These look like they are from two different stencils but, they are not. We had some issues with the cookie not sticking to the pan so when Ty was pressing he just pressed twice and it made them a little bigger :o)

I hope you all had a terrific weekend and I will be back soon, hopefully, with some project shares. In the mean time, I am still doing videos so come on over and check them out on my YouTube channel Babytweetums.

Hugs!